Pixiv日榜
Butterfly主题
- 在
themes\Butterfly\layout\includes\widget文件夹新建card_pixiv.pug文件,文件内容如下:.card-widget.card-pixiv
.card-content
.item-headline
i.fa.fa-image(aria-hidden="true")
span= _p('aside.card_pixiv')
iframe(src="https://cloud.mokeyjay.com/pixiv" frameborder="0" style="width:99%;height:380px;margin:0;")https://cloud.mokeyjay.com/pixiv使用的是超能小紫提供的服务,也可以自行搭建,搭建方式请看这里 - 编辑
themes\Butterfly\layout\includes\widget\index.pug文件,在你想要显示的位置插入以下代码:if theme.aside.card_pixiv
include ./card_pixiv.pug - 编辑
butterfly.yml文件,在card_webinfo下面添加一行card_pixiv: true - 编辑
themes\Butterfly\languages\zh-CN.yml文件(请根据你的网站语言选择),找到card_announcement: 公告, 在下面添加一行card_pixiv: Pixiv日榜Top50(后面的文本可自定义) - 如果不想显示,直接把
butterfly.yml文件的card_pixiv: true改为card_pixiv: false即可
其他主题
将以下内容插入到需要显示的地方:
<iframe src="https://cloud.mokeyjay.com/pixiv" frameborder="0" style="width:100%;height:380px;margin:0;"></iframe> |
访客地图
Butterfly主题
- 前往clustrmaps网站注册一个帐号
- 找到
Free Tools下面的Website Widget, 点击Get Map Widget - 输入你的博客网址,点击
Next - 根据你自己的喜好选择样式
Map widget或Globe Widget - 找到如下代码,记住src(
******的部分):<script type="text/javascript" id="clstr_globe" src="**********************">
- 在
themes\Butterfly\layout\includes\widget文件夹新建card_map.pug文件,文件内容如下:.card-widget.card-map
.card-content
.item-headline
i.fas.fa-globe-asia(aria-hidden="true")
span= _p('aside.card_map')
//- 下面这行适用于3D地图(Globe Widget)
script#clstr_globe(type="text/javascript" defer="defer" src="******************")
//- 下面这行适用于平面地图(Map Widget)
script#clustrmaps(type="text/javascript" defer="defer" src="******************")******部分填写上面的src, 3D地图和平面地图任选一个,不用的把代码删掉 - 编辑
themes\Butterfly\layout\includes\widget\index.pug文件,在你想要显示的位置插入以下代码:if theme.aside.card_map
include ./card_map.pug - 编辑
butterfly.yml文件,在card_webinfo下面添加一行card_map: true - 编辑
themes\Butterfly\languages\zh-CN.yml文件(请根据你的网站语言选择),找到card_announcement: 公告, 在下面添加一行card_map: 访客地图(后面的文本可自定义) - 如果不想显示,直接把
butterfly.yml文件的card_map: true改为card_map: false即可
其他主题
将上面第5步中的代码插入到需要显示的地方。
文章日历
- 安装
hexo-generator-calendar插件npm install --save git://github.com/howiefh/hexo-generator-calendar.git
- 下载
calendar.js和languages.js文件,保存到themes\Butterfly\source\js目录 - 编辑
calendar.js文件,在文件最后}(jQuery));之前添加:$(document).ready(function () {
$('#calendar').aCalendar('zh-CN');//'zh-CN'请根据自己博客的语言选择
}); - 编辑
butterfly.yml文件, 以下两个你butterfly.yml文件里有哪个就用那个,不要都用!- 在
CDN_USE->js下面添加如下内容:
- /js/calendar.js
- /js/languages.js- 在
inject->bottom下面添加如下内容:
- <script src="/js/calendar.js"></script>
- <script src="/js/languages.js"></script> - 在
- 下载calendar.styl文件,保存到
themes\Butterfly\source\css\_layout目录 - 在
themes\Butterfly\layout\includes\widget文件夹新建card_calendar.pug文件,文件内容如下:.card-widget.card-calendar
.card-content
.item-headline
i.far.fa-calendar-alt(aria-hidden="true")
span= _p('aside.card_calendar')
div.widget-wrap
div#calendar.widget - 编辑
themes\Butterfly\layout\includes\widget\index.pug文件,在你想要显示的位置插入以下代码:if theme.aside.card_calendar
include ./card_calendar.pug - 编辑
butterfly.yml文件,在card_webinfo下面添加一行card_calendar: true - 编辑
themes\Butterfly\languages\zh-CN.yml文件(请根据你的网站语言选择),找到card_announcement: 公告, 在下面添加一行card_calendar: 文章日历(后面的文本可自定义) - 如果不想显示,直接把
butterfly.yml文件的card_calendar: true改为card_calendar: false即可
投票系统
Butterfly主题
- 前往widgetpack注册账号
- 登陆后在点击左侧侧边栏
Rating->Install, 你会看到如下代码,记住id:<div id="wpac-rating"></div>
<script type="text/javascript">
wpac_init = window.wpac_init || [];
wpac_init.push({widget: 'Rating', id: *****});
(function() {
if ('WIDGETPACK_LOADED' in window) return;
WIDGETPACK_LOADED = true;
var mc = document.createElement('script');
mc.type = 'text/javascript';
mc.async = true;
mc.src = 'https://embed.widgetpack.com/widget.js';
var s = document.getElementsByTagName('script')[0]; s.parentNode.insertBefore(mc, s.nextSibling);
})();
</script>
<a href="https://widgetpack.com" class="wpac-cr">Star Rating WIDGET PACK</a> - 在
博客根目录/themes/Butterfly/layout/includes/post/目录内新建文件rate.pug, 内容如下:#wpac-rating
script.
wpac_init = window.wpac_init || [];
wpac_init.push({widget: 'Rating', id: #{theme.rate.id}});
(function() {
if ('WIDGETPACK_LOADED' in window) return;
WIDGETPACK_LOADED = true;
var mc = document.createElement('script');
mc.type = 'text/javascript';
mc.async = true;
mc.src = '//embed.widgetpack.com/widget.js';
var s = document.getElementsByTagName('script')[0]; s.parentNode.insertBefore(mc, s.nextSibling);
})(); - 编辑
博客根目录/themes/Butterfly/layout/post.pug文件,在!=partial('includes/post/reward', {}, {cache:theme.fragment_cache})下方添加:注意缩进if theme.rate.enable
include includes/post/rate.pugif与上面的if对齐 - 在
Butterfly.yml文件内添加:rate:
enable: true
id: #上面记住的id
其他主题
将第2步生成的代码插入到需要显示的位置。
加载中动画
Butterfly主题
更新到dev分支最新版即可。
其他主题
- 将以下内容添加到
<head></head>标签内:<link rel="stylesheet" href="https://cdn.jsdelivr.net/gh/HCLonely/images@master/others/loading.min.css">
- 将以下内容添加到
<body>标签后面:<div id="loading-box">
<div class="loading-left-bg"></div>
<div class="loading-right-bg"></div>
<div class="spinner-box">
<div class="configure-border-1">
<div class="configure-core"></div>
</div>
<div class="configure-border-2">
<div class="configure-core"></div>
</div>
<div class="loading-word">加载中...</div>
</div>
</div> - 将以下内容添加到
</body>标签前面:<script>
var endLoading = function () {
document.body.style.overflow = 'auto';
document.getElementById('loading-box').classList.add("loaded");
}
window.addEventListener('load',endLoading);
</script>
页脚跳动的♥
Butterfly主题
- 编辑
博客根目录/themes/Butterfly/layout/includes/footer.pug文件,将©${theme.since} - ${nowYear} By ${config.author}改为©${theme.since} - ${nowYear + ' '} <i id="heartbeat" class="fa fas fa-heartbeat"></i> ${config.author}, 将©${nowYear} By ${config.author}改为©${nowYear + ' '} <i id="heartbeat" class="fa fas fa-heartbeat"></i> ${config.author} - 将以下内容添加到
<head></head>标签内:<link rel="stylesheet" href="https://cdn.jsdelivr.net/gh/HCLonely/images@master/others/heartbeat.min.css">
其他主题
- 将
<i id="heartbeat" class="fa fas fa-heartbeat"></i>添加到需要显示的位置 - 同上第2步
页脚显示网站运行时间
Butterfly主题
- 编辑
博客根目录/themes/Butterfly/layout/includes/footer.pug文件,在最后span=theme.ICP.text下一行添加以下内容:
#running-time |
其他主题
- 将以下内容添加到需要显示的位置
<div id="running-time"></div> |
双评论系统
这里以同时使用Valine和Gitalk, 默认使用Valine为例。
请确认Valine和Gitalk已开启并正确配置。
- 修改
themes/Butterfly/layout/includes/comments/index.pug文件,将所有的else if改为if, 并在span= ' ' + _p('comment')下面添加:a#switch-comment(href="javascript:void(0);" title="切换为Gitalk" target="_self")
i.fa.fas.fa-toggle-off(aria-hidden="true")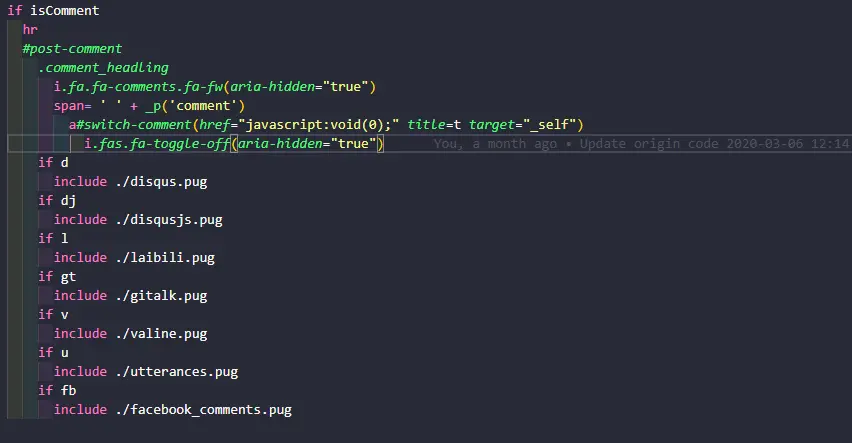
- 隐藏一个评论,保留一个默认评论
- 隐藏
valine: 修改themes/Butterfly/layout/includes/comments/valine.pug文件,在#vcomment.vcomment后面添加(style=‘display:none;’) - 隐藏
gitalk: 修改themes/Butterfly/layout/includes/comments/gitalk.pug文件,在#vcomment.vcomment后面添加(style=‘display:none;’) - 隐藏其他评论系统方法与上面类似
- 隐藏
- 在
themes/Butterfly/source/js/third-party/目录新建switch_comments.js文件,内容如下:function switchComment () {
const title = $('#switch-comment').attr('title') === '切换为Gitalk' ? '切换为Valine' : '切换为Gitalk'
const i = $('#switch-comment>i')
if ($('#gitalk-container').css('display') === 'none') {
$('#vcomment').slideUp('normal', () => {
$('#gitalk-container').slideDown('normal', () => {
$('#switch-comment').attr('title', title)
i.hasClass('fa-toggle-off') ? i.removeClass('fa-toggle-off').addClass('fa-toggle-on') : i.removeClass('fa-toggle-on').addClass('fa-toggle-off')
})
})
} else {
$('#gitalk-container').slideUp('normal', () => {
$('#vcomment').slideDown('normal', () => {
$('#switch-comment').attr('title', title)
i.hasClass('fa-toggle-off') ? i.removeClass('fa-toggle-off').addClass('fa-toggle-on') : i.removeClass('fa-toggle-on').addClass('fa-toggle-off')
})
})
}
} - 编辑
butterfly.yml文件, 以下两个你butterfly.yml文件里有哪个就用那个,不要都用!- 在
CDN_USE->js下面添加如下内容:
- /js/third-party/switch_comments.js
- 在
inject->bottom下面添加如下内容:
- <script src="/js/third-party/switch_comments.js"></script>
- 在
随机文章跳转
- 在
博客根目录/scripts(没有请自行创建)下新建random.js文件,内容如下:打开hexo.extend.generator.register('random', function (locals) {
const config = hexo.config.random || {}
const posts = []
for (const post of locals.posts.data) {
if (post.random !== false) posts.push(post.path)
}
return {
path: config.path || 'random/index.html',
data: `<html><head><script>var posts=${JSON.stringify(posts)};window.open('/'+posts[Math.floor(Math.random() * posts.length)],"_self")</script></head></html>`
}
})/random/就会随机跳转一篇文章 - 可选配置
- 可以在
_config.yml添加以下配置:random:
path: # 随机链接路径,默认"random/index.html" - 如果不想随机跳转到某篇文章,只需在这篇文章
Front-matter添加random: false
- 可以在
文章统计图表
安装
npm install hexo-charts -S |
使用
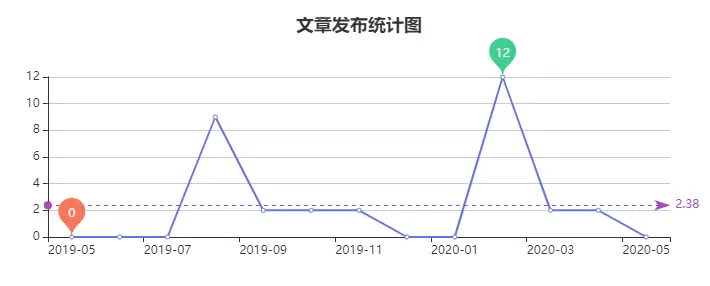
文章发布统计图
<div id="#posts-chart"></div> |
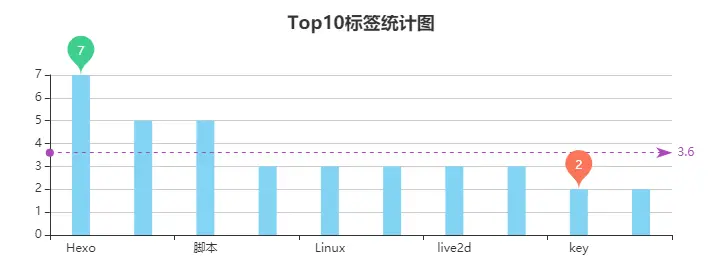
标签统计图
<!-- "data-length"为显示标签个数(从多到少),默认为10 --> |
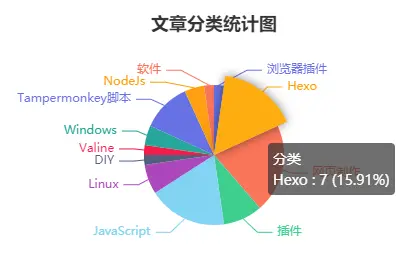
文章分类统计图
<div id="#categories-chart"></div> |
示例
Butterfly主题将图表添加到归档、分类、标签页面
将文章发布统计图添加到归档页面
在主题目录/Butterfly/layout/archive.pug文件的#archive下面添加一行#posts-chart, 新添加的比上一行多缩进两个空格。
block content |
将标签统计图和分类统计图分别添加到标签和分类页面
- 编辑
主题目录/Butterfly/layout/page.pug文件,在.tag-cloud下面添加一行#tags-chart,在.category-content下面添加一行#categories-chart,新添加的比上一行多缩进两个空格。
block content |
else if page.type === 'categories' |
文章二维码(仅Butterfly主题)
- 安装hexo-helper-qrcode插件:
npm install hexo-helper-qrcode -S |
- 编辑
主题目录/Butterfly/layout/includes/header/post-info.pug, 在文件最后添加以下内容:
span.post-qrcode |
valine评论添加博主等标签(仅Butterfly主题)
- 下载valine.pug文件,替换
themes/Butterfly/layout/includes/comments/valine.pug - 编辑
butterfly.yml文件,找到valine配置,添加以下配置项:
master: # md5加密后的博主邮箱 |


- 本文作者: HCLonely
- 本文链接: https://yilia.hclonely.com/posts/57bd67ce/
- 版权声明: 本博客所有文章除特别声明外,均采用 CC BY-NC-SA 许可协议。转载请注明出处!